So you want to start bass fishing?

Article by Jeff Banko

I was lucky enough to have a father that was a pretty serious fishermen who showed me the ropes when it came to tackle and equipment needs as I was starting out at a very young age.  Many of you are not lucky like I was.  All too often I see people that would really love to get into fishing especially for bass but become very frustrated and give it up because they are improperly outfitted.  Because of this I decided to try and share some of the knowledge I have gained in my 28 or so years of fishing and write something on the needs of a fishermen trying to get into bass fishing.

Rods and Reels

The first thing a person who wants to get into bass fishing will need to do is get themselves some rods and reels.  As a beginner my advice is to keep this as simple as you can.  I know you will see many seasoned vets, myself included, out there with a whole boat load of rod and reel combos but since you are just starting you don’t need to go that far.   I would suggest you do the following:

1)      Decide how much you are willing to spend but don’t go overboard.  You can buy quality reels for around $30 dollars and quality rods for around $30 – $40.  These reels will be good enough for you at this point, by no means garbage, and will easily serve you as you are learning to love the sport.  It won’t make sense for you to spend the big dollars on rod and reels right now because frankly I don’t think you would be able to notice the difference and appreciate them with a beginners  skill level.  Be patient buy the good stuff when you are good enough to really judge what you want.

2)      Get yourself one Spinning reel.  Look for a reel that will hold an ample amount of 8-10 pound test line.  Usually these will be in the 30 or 3000 series of  a reel for example I use Quantum, Catalyst 30PTi reels that will hold 160 yards of 8 pound test.  Have the reel spooled with 8 or 10 pound monofilament line.  Do not skimp on the line.  This is the one area where as a beginner you need to spend money.  Cheap line will make your life a nightmare with tangles and broken knots, etc…

3)      Match the spinning reel you choose to a rod of 6 or 6 ½ feet in a medium action graphite rod.

4)       Buy yourself a decent casting reel.  I prefer low profile design reels but you will have to make the choice of low profile or round body yourself.  In bass size reels you usually won’t have to make a decision on the line capacity for a reel.  The one thing you may see are different retrieve ratios.  Common ones are 6.1:1 or 5.2:1, what this means is the rate at which the reel brings like in.  A 6.1:1 reel will bring in line quicker than a 5.2:1.  Since you are a beginner go with the 6.1:1.  I believe it will be the best suited for your needs.  On the casting reel line with 10 to 14 pound test monofilament.  See my comments above about cheap line.

5)      Match the casting reel to a 6’ Medium action rod.

6)      Once you have your rods and reels practice your casting, especially with the casting reel/rod combo, in your yard or any open area.  Nothing will be more frustrating to you than trying to learn to cast while on the water where there are lots of things for you to snag.  I am not going to go into the details of casting a spinning reel or casting reel as there are plenty of places to go to find that out.  I will however pass on this piece of advice on setting up your casting reel before you cast.  On the reel there is a cast control knob, usually located behind the handle.  This knob controls the spools ability to spin freely.  To adjust this tie on whatever you are going to cast then hold the rod tip up a little.  Click open the reels spool release.  Whatever you have tied on should begin to fall.  If it does not then loosen up the cast control knob until it does.  If it does then proceed to the next step.  To set the knob right let your lure or weight to fall to the ground if the spool continues to spin once the lure hits the ground then tighten the knob slightly.  Continue to do this until the spool allows the lure to fall freely but then stops as soon as the lure hits.  Set the knob like this and it will help you avoid, not eliminate, some of the backlashes you are going to encounter.

Lure Selection

Now you have your rods and reels and they are all lined up to go, what kind of tackle do you need?  As with the rods and reels keep it simple.  Usually as you fish for bass more and more you will find techniques and tackle that you will like to fish more then others and you can specialize your buying toward that.  Right now since you are just starting it is a little harder because you really need to cover quite a few bases to find out what you like but still keep it simple.  Essentially lures can be broken down into a few categories:

  • Hardbaits (Crankbaits, Lipless crankbaits, jerkbaits, etc…)
  • Softbaits  (Plastic Worms, Senkos, Lizards, etc…)
  • Topwaters   (Buzzbaits, prop baits, poppers, jitterbugs, etc…)
  • Spinnerbaits
  • Jigs
  • Terminal Tackle

You need to attack this like the old daily food group thing where you were supposed to have items from each group.

Hardbaits

For hardbaits I would look to get the following

  • 1 crankbait that will run 4 – 6 feet deep in a shad or bluegill pattern i.e.  Rebel Wee R,  Rapala DT6, Bomber model A, etc…
  • 1 crankbait that will run 8 – 12  feet deep in a shad or bluegill pattern i.e.  Rebel Wee R,  Rapala DT10, Bomber model A, etc…
  • 1 lipless crankbait, ½ oz in a shad pattern i.e.  a Rat L Trap, or Rapala Rattlin Rap, etc…
  • 1 long minnow type bait (jerkbait) in a natural pattern i.e Rapala Husky Jerk, Smithwick Rogue, Bomber Long A, etc…
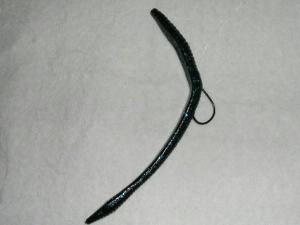
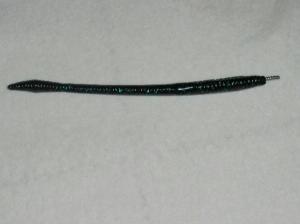
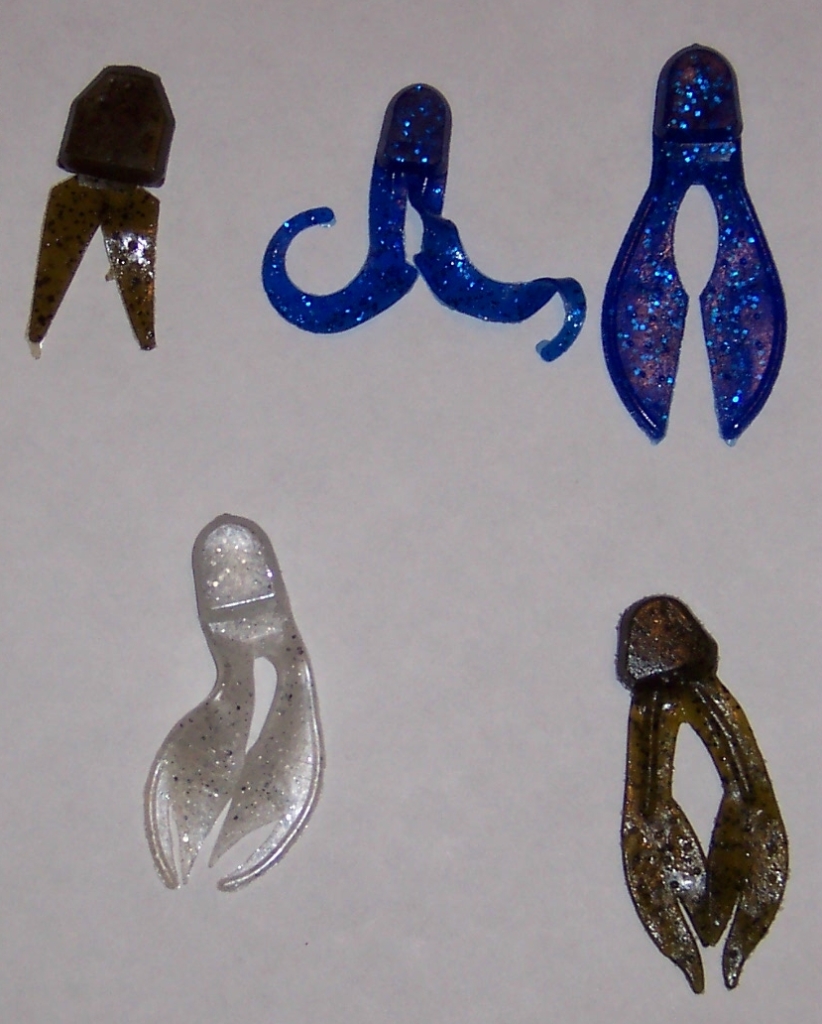
Softbaits

For softbaits look at:

  • Plastic worms with a ribbon tail in 6” or 8”. Need a few colors, pumpkin, watermelon, Blue or Blue Black, Red shad.
  • Senkos or similiar bait in same colors.
  • Lizards in same colors.

Topwater

For topwater:

  • Buzzbaits, one with a white skirt and one with a Chartreuse or Chartreuse w/white skirt.
  • Something like a Rebel Pop R.

Spinnerbaits

For Spinnerbaits:

  • ¼ oz with combo blades (1 willow leaf, 1 colorado) with a white skirt and one with a Chartreuse or Chartreuse w/white skirt.
  • 3/8 oz  with combo blades (1 willow leaf, 1 colorado) with a white skirt and one with a Chartreuse or Chartreuse w/white skirt.

Jigs

As far as Jigs for a beginner I would not go there.  Jigs are great for catching really big bass but in general you will not catch nearly as many.  Since I am writing this for a beginner my biggest concern is to suggest what will catch more fish.
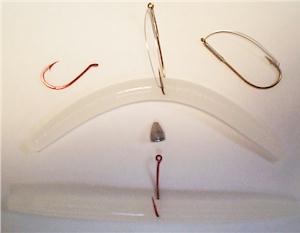
 Terminal Tackles

  • You will need hooks for rigging your softbaits.  Get yourself some 3/0 worm hooks they will cover your needs for now.
  • Weight – Buy an assortment of bullet weights ranging from 1/16 oz on up to ½ oz.


The above selection is obviously not all inclusive but I think it would definitely give you a good selection of items to get you started on the right track.

Where to learn what to do?

Now you have your rods and reels, where can you go to learn how to fish for Bass? Your lucky in that aspect.  This sport has taken off and because of the there is just a wealth of information out there.  Here is what I would do.


1)      Search the web, there are plenty of sites, like mine where you are reading this article, that can provide you great info on how to fish for bass.  A few notables are:  Bassdozer.com, Bassresource.com, BassBoatCentral.com, Bassfishingusa.com.  These sites provide info. For all levels of bass fishermen.  Also most of them have forums, as does this site fishingva.com, where you can interact with other fisher persons.  Do not hesitate to go to the forums and ask your questions?  That is the beauty of bass fishing, most of us will help another out without question.  Don’t hesitate to try and get to fish with some of the people you meet on forums.  A lot of more advance anglers like to help new fishermen out so take advantage of that.

2)      READ.  There are a lot of books and magazines out there that cover Bass fishing topics.   As a beginner I would tend to go more to books.  The magazines are great but cater more to advanced angler.  If you do go for magazines some of the ones that are not bass fishing specific  may be better for you as a beginner as they will cover things more general.  Check out Field and Stream, Outdoor Life, and mags like that.

3)      Go to your local tackle shop and talk to the people there.  One thing about us bass fishermen is we love to talk about out sport.  Take advantage of that and go pick the brains of your local experts.

4)      Watch fishing shows on TV.  I know it may seem like watching paint dry but you can learn a lot from doing this.  What you need to do is make sure you watch the shows with the mind set of you are going to learn.  Really pay attention not only to what the people on the show say but also to what they do.  You can learn just by seeing things like how they cast, etc…


That is all I have for what you need to do to get started.  Check back on the site often as I will be adding tactics whenever I can and one last thing….

Advice for Bass Fishing

Article by Wayne ‘CajunBass’
Just rambling about fishing.  I’m no “expert” but I have been bass fishing for a long time.

No matter where you’re fishing think in terms of “breaks.”  A break is something different.  A dropoff is a “break.”  So is a log in the water.  Both will attract fish.  A log that has fallen on a drop-off is a “break on a break.”  Even better.

A “break” can be anything.  A place where two types of grass come together.  A place where the shoreline changes from big chunk rock, to gravel, or gravel to sand.  You get the idea.  The bigger the change the better, but the more subtle they are, the less likely they are to have been seen by other fishermen. Fish relate to these places the same way you relate to road signs.  They tell them where they are, and how to get where they’re going as they migrate from deep to shallow and back.  A long flat area of mud for example doesn’t give a fish anything to relate to, but if you put a couple of stumps on that same flat, suddenly the fish have a “hangout.”  These are the kinds of places you’ll be looking for with your electronics, your crankbaits, your Carolina Rig sinkers.

When fishing a lake, a good tip is to observe the terrain around where you’re fishing.  Try to imagine what it looked like before they flooded the lake.  Is the land around flat?  If so it’s probably flat out under the water too.  If it’s steep and drops off suddenly, the same thing probably extends under the water.  A gully above ground is probably a ditch under water. If you see that the shoreline changes from pea gravel to chunk rock, you can figure that it extends out into the water also.  Watch for those types of places as you fish.

When fishing a river, remember that current is another key.  Think of current as wind.  In cold weather, you want to get out of the wind.  Fish are no different.  In cold weather they like to get out of the current so that they don’t expend any more energy than they have to.  In the summer it’s just the opposite.  Moving water is cooler than standing water.  Fish seek out current then.  Current is also a break.  Anyplace where the direction and speed of the current changes, or where two currents meet is a potential hotspot.

In tidal rivers, the same thing applies, but the water runs both ways. Outgoing tide pulls water and nutrients out of areas and into the main river.  As the water falls, baitfish and other forage are forced out of their hiding places.  Bass and other predators will “gang up” anywhere the water runs out of those areas.  Where a creek meets a channel, where a feeder creek meets a creek, and so on down to a place where you see a trickle of water no bigger than a pencil running across a flat.  Baitfish will come out and hold right along the waterline.  The predator fish will usually be right on the first breakline waiting for forage to make a mistake and wander over the deeper water.  Sometimes they won’t wait, they’ll run up into the shallow water and break up the schools of bait.

Incoming tide has the opposite effect.  Baitfish can move back up into the flooded areas and scatter.  This makes it much harder for the predators to find them.  The predator seems to understand that hunting is tougher at this time, and they tend to “shut off” during incoming.  You can find some places where baitfish are forced to congregate, and if you find one, you can bet that predators have already found it too.

The best techniques I’ve found for incoming tide is to simply put your trolling motor down, and cover ground.  Fish can still be caught but you have to work harder and cover more area for them.  I like to find pads or grass, and throw something like a rattle trap or a buzz bait.  Make lots of casts, always casting up the current and bringing your bait back “downstream”.  Keep your boat pointing into the current so the current won’t carry you along so fast that you can’t control the boat.  You want to be able to turn your trolling motor off, and have the boat drift back from the area you’re fishing, not drift over top of it.

Spinnerbait Techniques

Article by Jeff Banko

The spinner bait has to be one of the best and most popular bass baits out there but when I watch people fishing them I often notice that they are not getting the most out of them.  It seems to me to many of us just get hung up in the easiest way to fish this bait which is to just straight retrieve it at a constant fairly rapid speed in shallow water over weeds or around other cover.  You will catch fish this way but probably not as many as you could.  In order to have more success you have to start to think out of the box.  Next time you are out and you feel like a spinner bait might be what you want to fish try doing some of these:

 The Slow Roll

Really the name tells it all.  To slow roll a spinner bait just retrieve it at the slowest possible speed you can where you still can feel that the blades are working.  What this does for you is allows you to work the bait on or really close to the bottom. This tactic can be deadly when used over deeper weed beds or if you have found some deep structure such as hump.

Change the Pace

Instead of just retrieving at one speed mix it up.  As you reel the bait in speed up and slow down your retrieve as you go.  A lot of times the fish will hit as you speed up.  It must trigger an instinct that the bait is getting away or something.  Anyway if you think about this it makes sense as if you watch bait they rarely are swimming at one constant speed.

Yo-Yoing

You can do this technique combined with any of the above.  Just add a yo-yoing motion as you go through your retrieve.  To do this as you reel you can drop your rod tip down.  Then as you continue to retrieve lift the rod up this will cause the bait to rise and fall as you retrieve.  I have found this works really well combined with a slow roll over deeper water.

Kill It

Do any of the above retrieves or combination of retrieves but every once in a while just stop and let the bait flutter down. You can vary the amount of time you let the bait flutter to very short to long enough to let it come to rest on the bottom. When restarting your retrieve just give the rod a quick pop upward to get the blades spinning again and then continue on with your retrieve.  This works really well when you are retrieving past cover like stumps, retrieve until you are near the cover and then “kill it” and allow it to flutter down along the cover.  I know someone who employs this tactic and who catches some real hawgs by doing it.

Jig it

Rather than going with one of the retrieves above you can actually jig it.  Cast then allow the bait to fall all the way to the bottom.  Then sweep the rod up quickly.  Then slowly reel in retrieving line until the bait flutters back to the bottom.  Just keep repeating until you bring the bait all the way in.

There are really infinite possibilities you can employ when fising a spinner bait.  Just use your imagination.  That is what makes this such a fun bait to use.

The Charlie Brewer Slider Worm

Fishing the Slider Worm

Article by Cajunbass

Anybody ever use Charlie Brewer Slider worms? This is a technique that will help you catch more fish, and help you learn more about fishing at the same time, than anything else you can do.

For those of you who don’t know, a Charlie Brewer Slider worm is more than just a lure. It’s an entire method of fishing. It is probably the original “finesse” style of fishing. It’s simple, it’s inexpensive, and it catches fish. What more could you ask for?

You’ll need some simple tackle, most of which you probably already have. A med to med light, or I’ve even used an ultra light spinning combo, but I recommend a medium action rod actually. Whatever length you’re comfortable with, and a reel to match. Spool it up with 6 to 10 lb test line. I use 10 lb BPS Excel most of the time.

Now you’ll need to get your hands on some Charlie Brewer slider worms and the slider jig heads. I know you can get them at Greentops, but most well stocked tackle shops should have them. Go ahead and get the bags of 20. You will find them packed 4 to a card, but they’re a rip off that way. Get the bag. Then pick up some slider jig heads. I prefer the 1/8 oz “Super Slider” head. It looks like a Texas rigged worm rig, with the sinker molded to the hook. That’s really what it is. You rig the worm up “Texas” style so it’s self weed-less, and cast it out.

Now is where the fun part comes in. You just reel it back. That’s all. You don’t hop it, you don’t bump it, you DO NOTHING but reel it straight back to you, holding the rod at about the 10 o’clock position. You can’t reel it too slow. That is the key. Reel it so slow you think you’re going too slow. When a fish bites you, you’ll feel a weight. Just keep reeling until the slack is all out of the line, then set the hook with a snap of your wrist. You don’t need to “cross his eyes” or “jerk his lips off”. The little slider hook is very sharp, and of course you should have made sure it was even sharper. (right?) Make sure your drag is set properly, (Personally I tighten my drag down and back-reel, but most people will do better with the drag)

Give this a try. I think you’ll find it a very effective method. You will hear that “Sliders don’t catch big fish”. There maybe some truth to this, the biggest I ever caught on a slider was 6 lbs, but you will not find a better method to catch numbers of fish.

The Weedless Wacky Rig

Article by Jeff Banko with special thanks to Wayne Purdham

This is a technique that was taught to me by a fellow Virginia Bass fishermen, Wayne Purdham.  Wayne and I both fish Briery Creek Reservoir quite often and this is a tactic that works excellent there.

First off, in case you don’t know what a wacky rig is let me give a quick description of that technique.  The wacky rig has been around for quite some time (some say since the 70s)  but has recently gained huge popularity with the advent of soft stick baits as the technique works especially well with them.  The basic wacky rig is quite simple.  All you do is take a soft plastic bait such as a soft stick bait, or finesse worm, and hook it through the egg sac like in this picture.

wacky

To fish the wacky rig all you do is cast it to the location you expect fish to be holding on like a grass edge, stump, dock, etc… and allow it to sink to the bottom.  Hooking the bait like this causes the bait to have a unique wobbling motion as it drops which just slays the fish.  Quite often the fish will hit the bait on this initial drop so be prepared. If the bait is not hit on the initial drop to the key is to work the bait slowly.  Pick up the rod tip ever so slightly to raise the bait off the bottom and then let it drop again.  When it drops to the bottom patience is definitely a virtue here as many times the fish will pick the bait off the bottom after it has set for several seconds.  I have had days where I have let the bait sit as long as 30 seconds although most days between 5 and 10 seconds will suffice.  Continue to work the bait as long as it is still near the cover you wanted to fish.  For docks and stumps this may only be a few short lifts and lowers.  If you are fishing a grass edge or weed edge or open water channel, etc…you can work the bait all the way back to you.

Now what is the weed-less wacky rig.  Essentially it is the same rig and is fished the same way.  The difference lies in the type of hook used and how it is placed in the worm.  It is really an improvement on the normal wacky rig that addresses to flaws.  The first flaw is that baits rigged wacky style can be hard to keep on a hook as the soft plastic tends to tear when hooked this way, you will go through a lot of baits using this method.  The second flaw is that the rig will get hung up on weeds and other debris fairly easily as the hook point is exposed, even with wire guard weed-less hooks this seems to be a problem.  The weed-less wacky rig solves these problems quite well.  So how do you set it up?

How to Rig a Weed-less Wacky

Take a hook and insert the point into the worm at the front of the “egg sac”.  Thread it through the “egg sac” and bring the point back out on the back end of it.  It will look like this picture:

wackyhookinsert

Now continue to pull the hook through the worm until the eye of the hook is just about into the worm.  At this point rotate the hook 180 degrees so that the hook point is pointing back towards the worm body.  Then continue to pull the hook through the worm so that the eye becomes imbedded in the plastic of the worm.  To finish push the point of the hook into the worm.  I prefer to push it all the way through and then back it into the plastic.  The finished rig will look like this:

wackfinished

Hook Choice

I use Gamakatsu’s Octopus hooks in sizes 1/0 to 3/0.  Any similar hook will work.  I also find that the new red colored hooks i.e. “bleeding bait’ seem to work really well.

Adding Weight

I generally prefer to fish my weed-less wacky-rigs weightless as the slow fall seems to be what tantalizes the bass.  There are some case when I will add weight though, like if it is a little windy.  To add weight use finish nails or a “nail” weight.  You can insert it into the end or ends of the worm and fish it that way.  If you want the weight to fall a little bit head down add weight to the front of the bait.  If you want to maintain the “flat” fall then add weight to both ends.  The picture below shows how to insert a weight.

wacknail

Once again thanks to Wayne Purdham for showing me this rig.  Tight lines.

Fishing the Jig and Trailer

Article written by Jeff Banko

Jig fishing is a tried and true method for producing big bass.  In general you will not catch as many bass jig fishing as you will with some other tactics but for some reason the quality of the fish the jig will produce is usually better.  There is just something about the the jig that gets the big ones to hit.  This is one reason that you will find jig fishing as one of the mainstay tactics that anglers targeting trophy fish will use.

Oddly enough, even though most bass fishermen have heard of jigs and most bass fishermen would love to catch that “trophy” bass it seems that the majority of fishermen have never ventured to try them.  I was one of those fishermen until recently. I had always heard of how great the jig was for producing big fish but it also seemed like there was some mystique to the bait.  It just came across to me as a hard to fish bait that a lot of pros and hardcore bassers were able to catch fish on but not one that was that great for the average weekend basser because it would take too much time to learn how to fish.  How wrong I was.  Through good fortune I was able to hook up with two fishermen that fish a jig quite often.  Watching them fish the jig while I fished my soft plastics I learned a lot most importantly that it really was not that hard to do.  Anyway I decided to try it for myself and now I am sold.  I am so sold that I decided to do this tactics page just so others might become inspired to try to fish the jig themselves and see how great this bait really is.  Now to the good stuff the info on jigs.

First let me start with a quick description of the bait.  The jig is a very simple bait.  In a nutshell it is a lead headed bait that has a skirt of feather, hair, rubber or silicone on it.  Depending on the method you fish and the color you fish it will most closely resemble a minnow or crawfish.

Usually A jig will be fished with a “trailer” of pork or rubber.  The trailer just adds a little more movement to the bait and helps to make it look more lifelike it can also affect the sink rate of the bait as it adds bulk to it.   A lot of people ask about the differences in materials for the trailer.  A lot of what you use depends on personal preference but here is a quick summary of both.

  • Pork:  More lifelike feel to it.  Very traditional bait.  May have a more natural look to it. Very durable to fish.
  • Rubber:  More colors available.  Can use trailers that are bouyant to adjust the sink rate of your jig more than you can by just adding bulk.  Come in wide variety of shapes and sizes.

Pictures of pork and rubber trailers are below.

tralier

Jig Fishing Methods

I’ll start with the easiest and move on to what I perceive as harder methods.  Really all jig methods are relatively simple.  It is just that some will require you to be able to make specialized cast such as flipping, pitching, and skipping.

Swimming a Jig

The easiest method I have used.  Essentially all you do is cast out.  Let the bait sink to the depth you desire and then retrieve.  A few things to note.  First when swimming a jig it is very useful to have an idea of what depth you are fishing the jig at.  You can of course let the jig sink all the way to the bottom and then retrieve it so that it stays close to the bottom but quite often I have used this tactic to target bass that are suspended somewhere off the bottom.  The first thing I do everytime I tie a jig on is determine how long it takes for that jig/trailer combo to sink.  I generally try to find a depth of around ten feet.  I then pull a lot of line off the reel while holding the jig in my hand.  When I am ready I will throw the jig into the water.  As soon as it hits the water I will start counting 1001, 1002, 1003, 1004, etc… I can then use the count that it took to reach bottom to reasonably predict what depth my bait is at.  For example if the bait takes 10 counts to reach the 10 foot bottom it will be somewhere around 5 feet after 5 counts and somewhere near 15 feet at a 15 count etc…This is useful because lets say I am marking bait on my LCD at 12 feet I know how long to count before beginning my retrieve every time I cast.  From the example below i would simply cast, as soon as the bait hits the water begin counting and when I hit 1012 start my retrieve.  How to retrieve for swimming can vary quite a lot and will be determined by what the fish want.  The basics are to just straight retrieve the bait, straight retrieve the bait but vary the speed as you do so the bait slows and speeds up intermittently, straight retrieve while pumping the rod up and down slow the bait moves up and down in the water as you bring it in, and finally to use a stop and go retrieve where you reel the bait then stop and let it sink for a 1/2 second to a second and then retrieve again.

Hopping and Crawling

The simplest method for fishing a jig.  Simply cast the jig out and let it sink all the way to the bottom.  Then work it slowly back along the bottom.  You can just straight drag the jig, or drag the jig and hop it every once in awhile by giving your rod tip a short jerk up.

Flipping and Pitching

Flipping or Pitching a jig is probably the most popular method these lures are used.  Flipping and Pitching are specialized casting techniques that I will at some point try to explain in another tactics page.  For this article I will assume you are familiar with these casting methods and just explain how to use a jig with them.

Jigs are especially useful flipping and pitching lures because they are probably the most weedless lures you can fish if you fish a jig with a weed guard.  This makes them great for fishing pockets in heavy weed cover.  All you have to do is work weed areas and look for pockets or cover that you feel may hold a fish.  Then simply flip or pitch your jig to the area and allow it to sink.  Many times you will get bit on the fall.  In this type of fishing bites often are subtle so be a line watcher.  If the line moves side to side or stops sinking before you thought it hit bottom, strike.  When fishing cover like this you just don’t have the luxury of allowing the fish to move off until you are sure so strike early just in case it is a fish.  If you did not get struck on the initial fall you can shake the bait a few times on the bottom to try and draw a strike.  If no fish hits just retrieve and move on to the next likely spot.

The weed-lessness of the jig combined with its weight also make it very useful for flips and pitches to trees whether they be upright in the water or laying down or just a stump.  Fish them the same as you would in a weed pocket.  The big advantage with these baits is that while others may get hung up on braches and never make it to the targeted fish the jig with its high weight to relatively small size will usually be able to get down where the fish are.

Skipping a Jig

Skipping like pitching and flipping is a casting technique that I will at some point try to explain in an article.  Jigs are especially useful for skipping because of the high weight to small body size.  Use jigs to skip under branches or bushes that overhang the water or skip them under docks.  Then you just have to use one of the previously described methods, I usually opt for crawling and hopping it.

Equipment for Jig Fishing

Line

Because of the way you will fish this lure it is usually best to use a high strength line.  For most applications line in the 12 – 20 pound test class are preferred.  I will generally use a low stretch line so that I lose nothing in my hook set.  I have recently been using flouro-carbon lines a lot because they are less visible than others.

Reels

The type of reel you use is kind of open to personal preference.  For me I use three different types depending on what I am doing.  If I am swimming a jig or crawling and hopping a jig I will use one of my high speed 6.1:1 ratio casting reels.  In the open water that I usually fish these methods the high speed retrieve seems to be best.  If I am flipping or pitching I will switch to one of my lower speed casting reels 5.2:1 ratio.  Since these methods are in heavy cover and I am usually relatively close to the fish I am targeting I find the winching power of the slower speed reel to be better.  Finally if I am skipping a jig I will go to a spinning reel.  I just find that for skipping I have a lot less hassles with spinning gear.

Rods

For swimming and crawling I use a Medium Heavy Casting rod, 6 1/2 feet, Fast Action.  This rod gives the best combo of castability and fish fighting.  For flipping and pitching I jump up to a Heavy Casting Rod, 7 foot, Fast action.  This gives the most accurate rod for this technique while giving me the backbone to get fish out of heavy cover.  For skipping I use a medium spinning rod, 6 1/2 feet, moderate fast action.  This gives me enough whip to give me good skipping speed on the lures whiel still allowing me enough backbone to get fish out from under bushes and docks.


That is all. Hope this helps some of you out and inspires you to try the jig.